Most first flights end the same way: a nervous pilot, a drone a few hundred feet up, a gust rolling off the desert, and one panicked stick input. I have flown commercial jobs out of Phoenix since 2015, and I have watched that exact sequence play out in parking lots, on job sites, and once in my own backyard at 6 a.m. before a shoot.
Here is what nobody tells you when you buy your first drone. Beginner FPV drone setup is not really about the aircraft. It is about the twenty minutes before you arm the motors and the dozen habits you keep once you do. The drone matters, but it matters less than battery discipline, a legal place to fly, and the willingness to spend your first battery hovering at three feet like a nervous hummingbird.
This is the workflow I text to every friend who says "I bought a drone, now what." We will cover what to charge, what to register, where to stand, which buttons to learn first, and how to land without breaking anything. At the end I will name the two aircraft I would actually hand a beginner.
Why you should trust me
I fly four to five days a week, mostly real estate, weddings, and solar farm inspections, and my logbook goes back to a Phantom 2 in 2015. I have owned or flown more than twenty drones across the price range, from three-hundred-dollar toys to an enterprise rig I did not pay for. My summers are the reason I am paranoid about batteries: I have lost packs to Phoenix heat, and I have watched "40 minute flight time" turn into 22 minutes in August with a headwind.
One honest note before the recommendations. I have not put a hundred hours on either drone below. I am recommending them on category math, spec sheet, build class, and what the software experience looks like, not on a season of paid work. Where I am speaking from the pilot's seat, I say so.
I also do not race FPV quads. That is a different category with a different skillset, and if you want a racing build, this is the wrong article.
How I picked the drones in this guide
Four filters, in this order.
Weight and the rules. The regulatory squeeze on hobbyists is real, and the growth segment is sub-250g aircraft. Both picks here sit in that class or close to it, which keeps your options open as rules tighten.
The camera, not the megapixel count. Sensor size beats megapixels every time. I would rather have a smaller number on the box and a bigger sensor behind the lens, because a soft camera turns a good airframe into an expensive paperweight.
Battery math. Whatever the box promises, cut it by 30 to 40 percent for heat and wind, then ask how many packs you need to make a session worth the drive. If the answer is "more than one," buy the kit that includes more than one.
The app. The app is part of the product. A drone with a buggy app is a drone that will not fly when you need it, and a drone that wants an account login before a firmware update is a drone that wastes your good weather.
Both picks below are foldable, both are aimed at beginners, and both are in the band where you get a real camera without paying for enterprise features you will never touch.
The two drones worth starting on
You can learn on anything. You will learn faster and cheaper on an aircraft that survives a bad landing and has a camera you will still respect in six months.
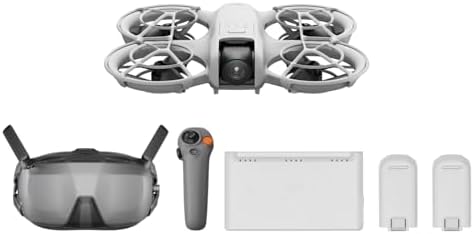
Budget pick: DJI Neo Motion Fly More Combo, Mini Drone With 4K UHD Camera for Adults
 Visit on Amazon →
This is the one I would hand a friend who has never touched a stick. It is a mini drone with a 4K UHD camera, and the combo packaging is the version to buy, because every kit with that naming scheme exists to solve the one-battery problem. One battery is not a session. It is a tease.
The camera is not going to carry a real estate listing by itself, and I would not shoot a wedding on it. But for learning framing, exposure, and how an aircraft drifts when the wind shifts, it is more than enough. The whole point of a first drone is to be the thing you are allowed to be bad at.
Flaws but not dealbreakers: A mini drone is a mini drone. It gets pushed around in an afternoon gust, and if you take it up in a Phoenix summer thermal, expect it to work harder than the flight time suggests. It also has a small sensor, which means golden hour footage is where it looks best and harsh noon light is where it falls apart. Plan your flights accordingly.
Anyone who wants to learn the basics without a five-hundred-dollar lesson in humility should start here.
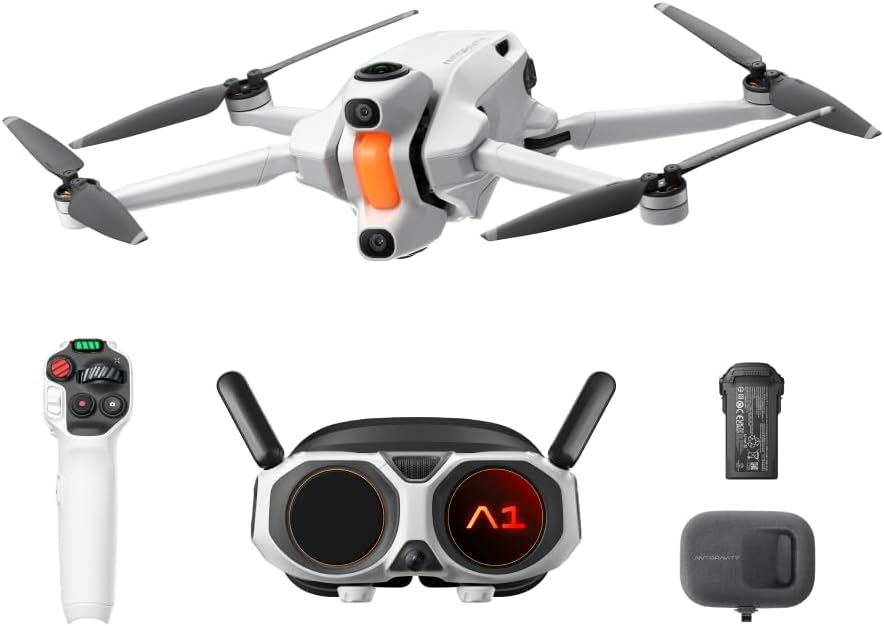
Upgrade pick: Antigravity A1 Standard Bundle, 360 FPV Drone with 8K Camera for Beginners | Immersive Goggles, Point-to-Fly Motion Control, Obstacle Avoidance, 249g & Foldable, Deep Track, Auto RTH, Auto Edit
 Visit on Amazon →
This is the one I would buy if you already know you want the immersive side of the hobby. It is a 360 FPV drone with an 8K camera, and the bundle includes goggles, so you are flying from inside the aircraft rather than watching it from the ground. The sub-250g foldable body keeps it in the friendliest regulatory class, which matters more every year.
The features that actually help a beginner are the ones doing the flying for you. Point-to-fly motion control means you can direct the aircraft by pointing rather than by mastering two sticks at once, which is the single hardest thing about learning FPV. Obstacle avoidance is a safety net underneath that. Auto return-to-home and auto edit handle the two moments where new pilots panic: getting back, and getting something watchable out of the footage.
Flaws but not dealbreakers: Goggles change the rules of engagement. When you are wearing them, you cannot see the airspace around you, so in the US you need a visual observer watching the aircraft and the sky while you fly. That is a second person, not a setting. Budget for it. And 360 footage is not a replacement for a normal camera on a paid job, it is a different deliverable that needs its own edit.
Anyone who wants to fly rather than just hover, and who has a friend willing to spot for them, will get the most out of this.
The first-flight workflow
This works on either drone above, and on almost anything with a GPS hold.
Step one: Charge everything the night before. Drone batteries, the controller, your phone, and a power bank. The most common way a first flight gets ruined is a controller at 20 percent.
Step two: Do the paperwork before you leave the house. In the US, recreational flyers take the TRUST test, which is free and takes about half an hour online. If your aircraft is over 250 grams, or you are flying for any kind of money, registration is on you. Neither of those steps is fun. Both take less time than the drive to the field.
Step three: Check the airspace map, then pick a field with nothing to hit. Stay away from airports, stadiums, crowds, and roads. An empty school field on a Sunday or the desert edge of town is the usual answer. If you are flying with goggles, bring your visual observer.
Step four: Calibrate in the open, away from metal. Follow the app prompts for compass and IMU. Do not do this next to your car, a chain-link fence, or a rebar-reinforced slab. A bad compass calibration is the number one cause of a drone that suddenly flies sideways.
Step five: Set your return-to-home altitude above the tallest thing within a quarter mile. If the tallest palm in the area is forty feet, your RTH altitude should clear it with room to spare. This takes ten seconds and saves the drone.
Step six: Hover at three feet and let it sit there. Hands off the sticks. Watch for drift. If it holds position, you are good. If it wanders, land, recalibrate, and try again. Nobody has ever regretted a boring hover test.
Step seven: Learn three controls before you learn anything else. The pause or brake button, the return-to-home button, and the shutter. The pause button is the one that turns a panic into a non-event.
Step eight: Fly a slow square. Forward thirty feet, stop. Right thirty feet, stop. Back, stop. Left, stop. That one pattern teaches you orientation, braking distance, and how the camera behaves when the aircraft moves. Do it on every battery for your first month.
Step nine: Land at 30 percent, not 5. Heat and wind eat capacity faster than the app predicts, and the last ten percent of a pack is where the voltage sags and the aircraft gets twitchy. Then let the battery cool before you charge it. A hot pack going straight onto a charger is how you shorten its life.
Step ten: Log the flight. Wind, temperature, time in the air, battery percentage at landing, anything weird. After ten flights you will know your real flight time in your real conditions, and it will be shorter than the box said.
Where beginners lose drones
Wind above your skill level. Check the surface wind and the wind at altitude. If the trees are moving hard, fly another day. A drone that can fight the wind can also run out of battery doing it.
Trusting obstacle avoidance. It is a safety net, not a pilot. Sensors miss thin branches, wires, and anything reflective. I still fly like it does not exist, and I have the prop scars to justify it.
Losing line of sight. The moment you cannot see the aircraft, you are one gust from a search party. With goggles on, that job belongs to your observer.
Flying over people and dogs. They will come to you. They always come to you. Pick a spot where the nearest human is a hundred yards out.
Updating firmware at the field. Do that at home, on wifi, before you leave. Nothing kills a good weather window like an app that wants a login and a download at the trailhead.
Charging a swollen pack. If a battery puffs, retires. It is done. Do not convince yourself otherwise.
What a starter kit actually costs
The aircraft is the cheap part of the first year. What eats the budget is everything around it: a second and third battery, a charger that can fill them in parallel, memory cards rated for the write speeds these cameras demand, ND filters if you shoot in desert sun, spare props, and a case that actually fits with the gimbal guard attached.
Then there is the care plan question. If the manufacturer offers accident coverage, the first year is exactly when you will use it, because the first year is when you crash.
Check current Amazon price on both drones above, then do the math on the battery count you actually need rather than the single pack in the box. Two extra batteries will change your experience more than any accessory you can buy.
The short version
Your first drone does not need to be impressive. It needs to be legal, cheap enough to crash, and simple enough that you spend your first ten batteries learning instead of troubleshooting. Get the paperwork done, calibrate in the open, hover at three feet, fly the square, land at 30 percent, and write down what happened.
Do that for a month and you will be a better pilot than half the people flying a much more expensive aircraft. The drone was never the hard part.