The box shows up with a drone, a set of goggles, one battery, and a manual translated by a committee. Most beginners charge it, strap the goggles on, arm the motors, and learn in about nine seconds why every FPV pilot repeats the same sentence: fly line of sight first. Setting up an FPV drone with VR goggles is not difficult. It is a sequence, and the order matters far more than the hardware.
I have been flying out of Phoenix since 2015, when I bought a Phantom 2 and immediately proved that a GPS-guided drone will absolutely fly into a saguaro if you let it. Since then I have owned or flown more than 20 airframes, from $300 toys to a $15,000 enterprise rig, and I fly four or five days a week in heat that regularly passes 110 degrees. My logbook is mostly battery degradation and gimbal failures. That is why I write about setup instead of spec sheets: the gear is the easy part, and the habits are what keep you in the air.
So here is the whole job in one line. Charge everything, read the rules, bind the goggles on your kitchen table, hover line of sight until it is boring, and only then put the goggles on with a second person watching the sky.
Why you should trust me
I fly for money. Real estate, weddings, and solar-farm inspections, four or five days a week, in a city that treats lithium batteries like a personal insult. I have replaced swollen packs at 80 percent health, I have pulled gimbals that started twitching after a summer, and I have watched more than one pilot learn about prop wash the expensive way.
I do not race quads and I do not build them, which is a boundary I hold on purpose. That is a different category with a different skillset, and someone who tells you otherwise is selling something.
What I can tell you is what the two airframes below actually are, what to verify in the listing before you pay, and the order of operations that turns a box of parts into a flight.
How I picked these two, and what I did not test
I have not logged stick time on either airframe in this article, and I am not going to invent flight times, range numbers, or measurements to fill the page. What I did instead is pick the two listings that represent the two real doors into this hobby, then tell you exactly what to check in each one before you spend money.
Door one is the all-in-one kit: airframe, camera, and goggles in a single box with brushless motors. Door two is the camera-first path: a folding drone and a standard remote, where the point is footage rather than the goggle experience. Those are genuinely different purchases, and buying the wrong one is the most common $800 mistake I see.
The standard I used: brushless motors over brushed, parts availability over a low sticker, and a listing that tells you what is in the box. The numbers I care about on any listing are prop availability, battery availability, and whether the kit ships with one battery or three. One battery is a 15-minute hobby. Three batteries is an afternoon.
The two ways in
Pick your door before you pick a drone. Both of the airframes below will get you flying, but they will not teach you the same skills.
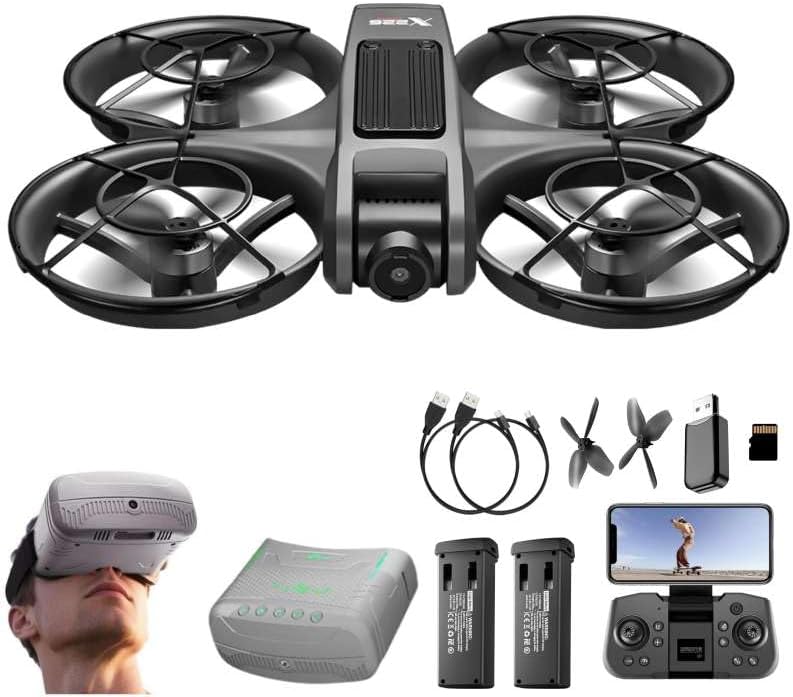
Budget pick: FPV Drone with Camera and VR Goggles for Adults, Brushless Quadcopter Kit
 Visit on Amazon →
This is the whole system in one purchase: quad, camera, and goggles. The detail that matters most in that name is brushless. Brushed motors are the reason cheap drones die in month two. They wear out, they cannot be rebuilt, and when one goes you are usually shopping for a new drone instead of a new motor. Brushless motors are serviceable and they survive the kind of crash a beginner has in week one.
The kit form also solves the compatibility puzzle that eats a beginner's budget. Goggles and video transmitters have to agree on band and channel, and buying those two pieces separately is how people end up with a set of goggles that will not talk to the camera they bought. When the goggles ship in the same box as the quad, that conversation already happened.
What to verify before you order: that spare props and extra batteries are sold separately for this airframe, and what the goggles actually are. The phrase VR goggles gets used for everything from a true low-latency FPV feed to a phone-in-a-plastic-shell viewer, and those are not the same product. Check current Amazon price.
Flaws but not dealbreakers: Kit goggles are kit goggles. They will get you flying and they will be the first thing you want to upgrade. Buy the drone first and treat the goggles as a starter set.
Anyone who wants to be in the air this weekend, on a single purchase, without hunting for matched parts, should start here.
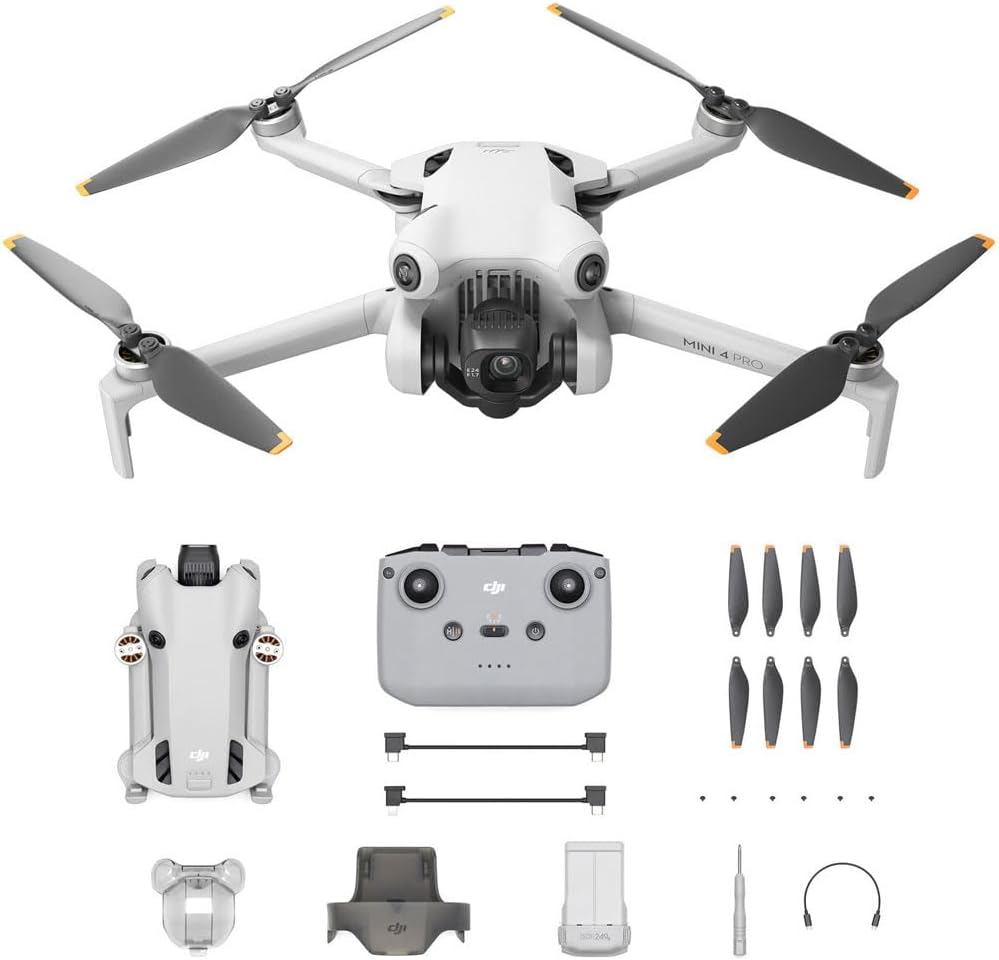
Camera-first pick: DJI Mini 4 Pro 4K HDR Folding Drone with RC-N2 Remote Kit - (Renewed)
 Visit on Amazon →
This is the other road. It is a 4K HDR folding camera drone with the RC-N2 remote kit, and it is a renewed unit, which is the part that should drive your decision. It is not a goggles-first FPV quad. If the goggle experience is the reason you are here, this is not the purchase. If the reason you are here is usable footage and you are happy to fly with a screen instead of a headset, this is a serious airframe.
Renewed is not a dirty word when you know what you are checking. A renewed listing means someone owned this aircraft before you did, so the inspection points shift. Verify three things: the return window, whether batteries are included and how many, and whether the seller is shipping a full kit or an airframe only. Batteries are the real cost of drone ownership. A renewed body with one tired pack is a worse deal than a used kit with three good ones.
Check current Amazon price before you decide, and price the batteries separately so you know what you are really paying for the package.
Flaws but not dealbreakers: Renewed stock varies by seller, so two listings that look identical can ship very different kits. Read what is in the box before you commit.
Anyone who wants a camera first and a hobby second will get more out of this than out of a starter FPV kit.
Step by step, from box to first flight
This is the sequence. Do it in order and your first flight is short, boring, and cheap, which is exactly what you want.
Step 1: Charge everything, then charge it again
Charge the flight batteries, the remote, and the goggles the night before. Charging a battery to 100 percent and flying immediately is fine. Charging to 100 percent and letting it sit for a week is not, and it is how packs swell in a Phoenix garage.
Read the charger. Most kits ship with a charger that does the job slowly, and that is a feature, not a bug. Fast charging in heat is how you shorten the life of the most expensive consumable you own.
Step 2: Know the rules before the props turn
If you are in the United States, take the TRUST test. It is free, it takes half an hour, and it covers the parts of the rules that actually get people fined. Register the aircraft if its takeoff weight clears the FAA threshold, and check that number on your own airframe rather than trusting a listing headline.
Goggles block your eyes. Without them you can see your drone; with them you cannot. That is a legal problem in most places and a practical problem everywhere.
Step 3: Bind the goggles on the bench, not at the field
Do the pairing at your kitchen table with the props off. Power the quad, power the goggles, let them find each other, and set your channel manually rather than leaving it on auto. Write the channel on a piece of tape on the battery. When you show up to a field full of other pilots, you will want a channel you know rather than a scan that fights everyone else.
Confirm the camera feed is live and the goggles are showing you the aircraft's camera, not a menu screen.
Step 4: Fly line of sight until it is boring
No goggles. Fly the quad visually and practice one thing: a stable hover at chest height, nose out. Then hover at chest height, nose in, which is the one that rewires your brain because the controls reverse in your hands.
Do this until hovering is boring. Boring is the goal. The pilots who skip this step are the pilots who fly into things.
Step 5: Add the goggles with a spotter
Now the goggles go on, with a second person standing next to you watching the sky and the aircraft. Your spotter keeps you legal and, more importantly, keeps you out of the tree you cannot see through a camera feed.
Start in an open field with nothing taller than your knees. Fly forward, turn, come back. Do not chase speed. Do not fly behind yourself. When your spotter says stop, stop.
Step 6: Practice the bail-out before you need it
Find the disarm switch or the mode switch with your thumb while you are calm, then practice hitting it in flight, at altitude, over grass. Every pilot who has ever panicked and flown a quad into a wall had that switch available and did not use it.
Obstacle avoidance, if your airframe has it, is a safety net. It is not a pilot. I fly like it does not exist, and so should you.
Step 7: Cool down before you charge
Land, unplug, and let the battery sit until it is close to ambient temperature before it goes on the charger. Hot packs plus fast charging is how you turn a healthy battery into a swollen one, and I have lost two packs to Arizona summers doing exactly that.
Then walk the airframe: props for nicks, motors for grit, camera lens for dust, gimbal for smooth travel. Two minutes now saves a mid-shoot failure later.
Mistakes that kill first flights
- Arming the motors in the house to "just check" the goggles. Do the check with the props off.
- Flying the goggles on day one with no spotter, in a park with people in it.
- Buying one battery. Two is the minimum for a real session, three is comfortable.
- Charging hot packs. It is the fastest way to a swollen battery and a grounded weekend.
- Trusting a flight-time claim. Those numbers come from a lab on a cool day with no wind, and real air cuts them by a third.
- Skipping the return policy check on a renewed listing. Read it before you fly it.
What this actually costs
The sticker is never the cost. On the FPV side, budget for spare props, at least one extra battery, and a set of ND filters if you plan to shoot in daylight. On the camera side, budget for batteries first, because a renewed kit may ship with one pack and your session length is written directly on that number.
Check current Amazon price on both listings, then price the accessories separately. Props and batteries are where drone ownership gets expensive, and a listing that sells parts for the airframe you bought is worth more than a listing that does not.
The rest of the spend is time. A free TRUST test, an hour of hover practice, and one Saturday in an empty field will do more for your flying than any upgrade you can buy.
The categories I left out, and why
Racing builds are not here. Neither are cinewhoops, long-range rigs, or anything with a thermal payload. Those are different tools for different jobs, and a how-to about first flights should not be a shopping list for three hobbies.
I also left out the $300 toy class. It looks like a deal until you price the second one, because the first one will not survive the skillset it teaches. If a listing cannot tell you whether the motors are brushless, that is your answer.
The two airframes above cover the two doors that matter here: the all-in-one goggles kit and the camera-first drone. Pick the door, run the sequence, and keep your first month boring.
That is the job. The goggles are a tool, not a shortcut. Fly like someone is watching, because for the first few weeks, they should be.