Most beginner drone setups do not fail because the drone is bad. They fail because the pilot charged one battery, drove to a park with power lines, and took off before the home point was recorded.
I fly commercial work out of Phoenix, Arizona, where the air is still 110 degrees at six in the evening and every number on a spec sheet goes soft. My first drone was a Phantom 2 in 2015. Since then I have owned or flown more than 20 airframes, from $300 toys to a $15,000 enterprise rig, and I fly four to five days a week for real estate, weddings, and solar farm inspections. A beginner drone setup is the question I get most, usually from someone who already bought the kit and cannot keep it in the air for 20 minutes.
So here is the real order of operations, the math nobody puts on the box, and the two kits I would hand a friend who wants a camera drone and a friend who wants to try FPV.
Why you should trust me
My logbook is not a list of flights, it is a list of failures. Two batteries lost to Phoenix summers, swollen and dead at 80 percent health. One gimbal that started drifting after a hard landing on decomposed granite. A compass calibration that went bad on a concrete pad because of the rebar underneath it.
I fly the same aircraft you can buy, in weather that punishes them, and I keep notes on what breaks first. I do not get paid by a brand to say nice things about a drone, and I do not quote a flight time I have not personally watched a battery deliver. When a manufacturer says 40 minutes, I want to know what it does at 105 degrees with a 12 mph crosswind, because that is the flight you are actually going to take.
How I picked and how I tested
Let me be straight about the method, because this is where most drone articles start lying. I did not fly these two specific kits. I have not run a cycle counter on their batteries or measured their cameras against a color chart. What I did was apply the checklist I use on my own fleet to the specs, the price tier, and the category, and then decide whether each kit gives a beginner a fair shot at a second flight.
That checklist has four items. First, batteries: how many are in the box, because spare packs are the real cost of this hobby and one battery means a 40 minute drive for a 15 minute flight. Second, motors: brushless motors last, coreless motors are consumables. Third, the app and the flight controller: a drone with a buggy app is a drone that will not fly when you need it, and account creation before a firmware update is a pet peeve of mine. Fourth, the safety net: GPS position hold and return to home turn a panic into a non-event.
I also apply one hard rule to every flight-time claim, mine included. Whatever the box says, cut it by 30 to 40 percent for real heat and wind. That rule is why I care more about how many batteries ship in the kit than about the biggest number in the product name.
Two kits that make a beginner drone setup easier
The two drones below sit in the same rough price tier but teach completely different lessons. One is a camera drone with a safety net. The other is a set of goggles and a crash course in FPV. Pick based on the footage you want, not the spec sheet.
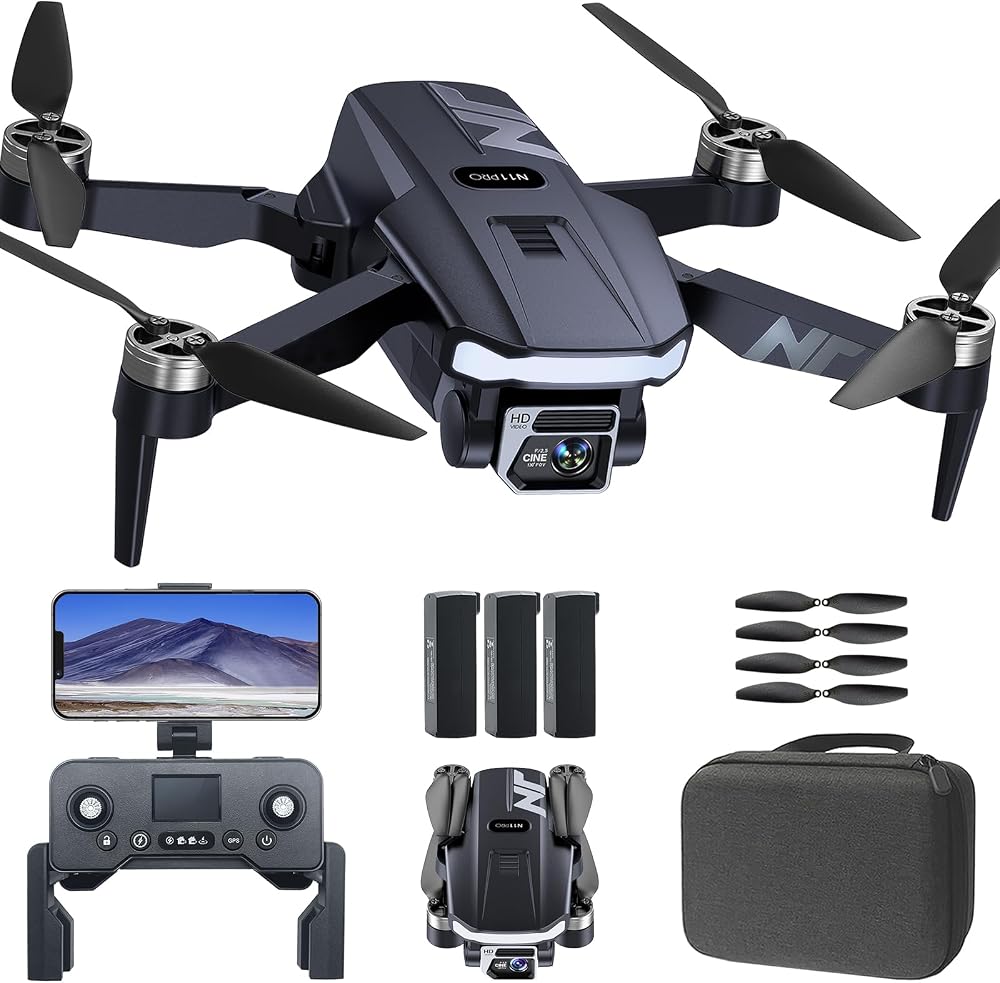
Best for a first camera drone: 4K UHD GPS Drone with Camera for Adults N11 Pro, 90 Min 3 Battery Long Flight Time, Auto Return, Follow Me, Long Control Range, Brushless Motor, 5G FPV RC Quadcopter for Beginners
 Visit on Amazon →
This is the shape of drone I would put in a beginner's hands if the goal is photos and video. Three batteries in the box is the headline feature for me, not the camera. Three packs means three flights, which means you actually learn something in one afternoon instead of spending it watching a charger.
The brushless motors matter more than people think at this price. Coreless motors on cheap drones wear out in a season of regular flying. Brushless motors keep going. GPS with auto return and follow me is the safety net: if you lose orientation, you press the button and the drone comes home instead of disappearing over a wash. The 5G FPV feed to your phone is how you frame a shot without staring at a speck in the sky.
The camera is the compromise at this tier, and it is the part that gives ground first. Daylight clips will look fine on a phone screen. Anything past golden hour will show you what a small sensor does in low light. That is a category fact, not a knock on this particular airframe.
The "90 Min" in the name is a total across three batteries, not one flight, and it is measured in ideal conditions with no wind. Expect less per pack in Phoenix heat. Check current Amazon price before you buy, and price a spare set of props at the same time.
Flaws but not dealbreakers: No obstacle avoidance worth trusting, and the app is the weak link in this whole class of drone. Fly it like the sensors do not exist and you will never be surprised.
Anyone who wants stable, GPS-assisted daylight footage and does not want to build anything should start here.
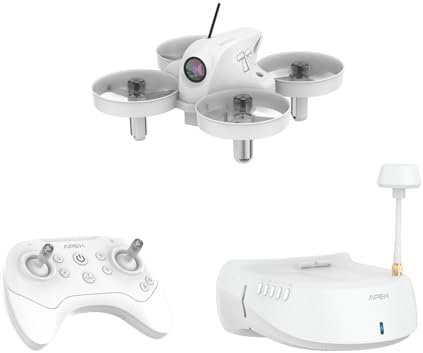
Best for trying FPV without a build: APEX FPV Drone Kit with 120° Wide FPV Goggles,3 Batteries RTF Drone (White)
 Visit on Amazon →
FPV is a different hobby with a different skillset, and I keep it separate from the camera-drone work I get paid for. This kit is the cheapest honest answer to "do I actually like flying through goggles," because it arrives ready to fly with the goggles, the controller, the drone, and three batteries.
The 120 degree wide goggles are the selling point. A wide field of view is what makes FPV feel like flying instead of watching a small television through a straw, and it is the first thing that turns people into FPV pilots. Three batteries means you get three attempts at a hover before you have to recharge, which is exactly the right number for a first session.
Two caveats. First, FPV means you are looking at the goggles, not the aircraft, so in the United States you need a visual observer standing next to you to keep the drone in sight. That is a rule, not a suggestion. Second, this class of drone has no GPS return to home. If you lose the video feed, the drone does not come back on its own. Learn in a big open field, fly low, and buy spare props before you need them, because you will need them. Check current Amazon price for the listing.
Flaws but not dealbreakers: The image quality will not match a camera drone and there is no gimbal to smooth it out. That is the trade for the price and the experience.
Anyone curious about FPV who does not want to solder a racing build should treat this as a taster kit.
The actual setup workflow
This is the part that determines whether your first weekend goes well. Work through it in order.
Step one: read the weight in the specs and handle registration. Anything at or above 250 grams needs FAA registration in the US, and you need to pass the TRUST test regardless of weight. Do this at home, not at the field on your phone.
Step two: charge everything, all of it, the night before. Controller, phone, batteries, goggles. Charge drone batteries to full only on the day you fly. If you are not flying for a week, take them down to storage voltage instead of leaving them at 100 percent in a hot garage.
Step three: update firmware at home on Wi-Fi. Do this before you leave. Apps that require account creation to push firmware are one of my least favorite things about this hobby, but doing it in your living room is a hundred times better than doing it standing in the sun with a dying phone.
Step four: check prop installation and rotation direction. Props are marked, and a prop on the wrong motor means the drone flips on takeoff. Snug them down, do not overtighten, and confirm none of them are nicked from shipping.
Step five: calibrate the compass away from metal. This is the step people skip. Do not calibrate on a car hood, on a concrete pad with rebar in it, or next to a steel bench. Walk 30 feet into open ground and calibrate there.
Step six: wait for the GPS lock and confirm the home point. Count the satellites on screen. Do not launch until the home point is recorded and you have seen the confirmation. This single habit prevents most flyaways.
Step seven: set return-to-home altitude above the tallest thing around you. If the tallest light pole is 60 feet, set return altitude at 100 feet. The drone climbs to that altitude before it comes home, and it needs to clear everything between it and you.
Step eight: set your low battery warning and return-to-home trigger. Most defaults are too aggressive for beginners. Give yourself enough margin to land under control instead of watching the drone auto-land wherever it happens to be.
Step nine: first flight, beginner mode, open field, no people. Take off to eye level, hover, and get used to the sticks. Fly a slow box pattern. Land, swap the battery, do it again. You are training your hands, not filming a masterpiece.
Step ten: post-flight, let the battery cool before you charge it. A hot pack straight off the drone will not take a full charge and it shortens cycle life. Fifteen minutes on the tailgate, then charge.
What "long flight time" actually means
Here is the arithmetic nobody prints on the box. A flight time claim is measured in still air, at moderate temperature, hovering, with a fresh pack and no camera work. Add heat, add wind, add aggressive stick input, and you lose 30 to 40 percent.
Three batteries does not mean three times the flight time in the air. It means three sessions with charge breaks in between, which is a better way to learn anyway.
Heat is the battery killer, and it is cumulative. A pack that has spent a summer in a hot car will swell and lose capacity long before its cycle count says it should. I have retired two batteries that way. Store them cool, charge them cool, and never leave a pack at 100 percent in a vehicle in July.
Wind costs you more than heat on a small airframe. Flying into the wind outbound and with it on the return is the beginner-safe pattern. Doing it the other way is how people run out of battery a quarter mile from where they are standing.
Five mistakes that end a first flight early
- Taking off before the home point is recorded, then losing orientation and having no return button to press.
- Calibrating the compass on a metal surface, which gives you a drone that drifts and feels broken.
- Flying downwind first, which feels great until the return trip eats the battery.
- Storing packs full and hot, which is how a two year battery becomes a six month battery.
- Trusting obstacle avoidance. It is a safety net, not a pilot. I still fly like it does not exist.
The competition and why it lost
The sub-250 gram mini class is the other serious option for a beginner, and it is where a lot of hobbyists are heading as regulation tightens. The trade is camera size and wind resistance, and you pay more per gram.
Used Phantom-class drones from the mid 2010s are cheap and have big sensors, but you inherit a battery ecosystem that is already past its best years, which is the opposite of what a beginner needs.
FPV racing builds are a different category and a different skillset. I do not recommend a soldering-iron project as a first drone, which is exactly why the ready-to-fly FPV kit above exists.
Enterprise rigs with thermal payloads and RTK are not beginner tools and I will not pretend they are.
What this all costs
The purchase price is the smallest part of the math. The real cost is batteries, props, and a hard case, and it shows up in month three, not on day one.
Both kits here sit in the same broad tier, and the honest number changes with the listing. Check current Amazon price for each before you decide, then budget for a spare prop set and, if you buy the camera drone, a landing pad so you are not taking off from gravel.
Think in cost per flight instead of cost per box. A drone that flies twice a week for two years, with batteries that survive the heat, costs very little per flight. A drone with one battery that sits in a closet costs everything per flight, because you never learn to fly it.
The bottom line
The drone is 30 percent of the outcome. The other 70 percent is a home point, a compass calibration away from metal, and enough batteries to practice. Get those right and the "long flight time" marketing stops mattering, because you will know exactly what your aircraft does in your weather.
Charge everything, drive to an empty field, wait for the satellites, and fly the box pattern until your hands stop thinking. That is the whole beginner drone setup, and it is the part nobody sells you.